1. Operating environment
1, Android 4.4.2 and the above version.
2, support three ways to connect the device through WiFi, Bluetooth (to support BLE), and serial port (RS485).
3. Unless special instructions are given, the mobile phone is used instead of all the devices that support the Android system.
Two. System landing
NET on the right,
1. A flat plate for WiFi or support for the RJ45 interface
2, the working mode of the networking module must be modified before connection: Server
3. If you want to use traffic for a remote connection, the network module end must have a fixed IP, or a proxy (such as the peanut shell).
BLE on the right,
1, mobile phone must support low power Bluetooth
2, a dedicated Bluetooth RS485 module must be connected to the bus
3, when the phone does not support BLE, the scan button is disabled, and the button button can list all the Bluetooth devices found, but only connect the Bluetooth to BYD001 RS485 with the name of RS485.
5. Press the [scan] button and stop scanning automatically after 30 seconds
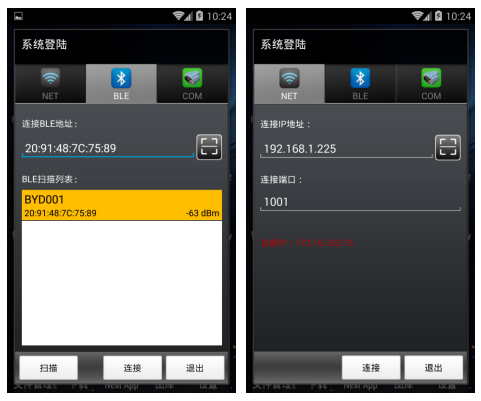
COM on the right,
1. Mobile phone (generally industrial flat) must support serial port
2, if the cell phone only supports RS232, you need to add a RS485 conversion module
Scavenging Description:
1. There is no need to select the specific connection mode when the code is scavenged, and it will be selected automatically according to the content of the two-dimensional code.
2. Support two kinds of two-dimensional codes:
A, containing only connection information, automatic filling after the scavenging is completed
B, including: connection type, connection information, module type, module number, automatic filling, automatic landing and automatic connection after the scavenging is completed.
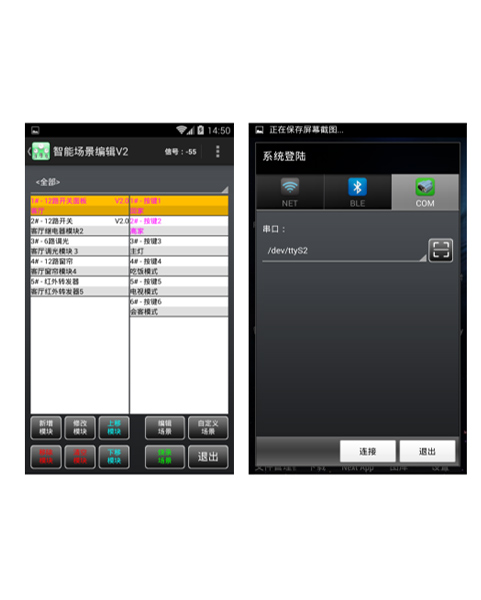
Three. The main interface is on the right.
1. All interfaces can be returned or withdrawn by clicking the title bar
2, NET and BLE showed the signal intensity is negative, the more close to 0, the better signal. Take the WiFI as an example: the -40 signal is very good, and the -80's signal is basically not
3, COM will display the serial number
4. Menu, please refer to the respective instructions
5. Screening dropdown, used for screening by module type
6, the left list is a list of modules (pink indicates that this module is a panel)
7, the right list is the list of the current module's burning location, key, loop and other information list (pink shows the location of the location of the burning location data).
Five. The options are on the right.
User type:
Guest: without a password, you can edit the template and view the burning content, not [burn] and [advanced] settings
Customers: need the password, can [burn], can not do [advanced] setting
Internal: you need a password, have all the functions, and only do not see the received data in [sending data].
Management: need a password, have all the functions
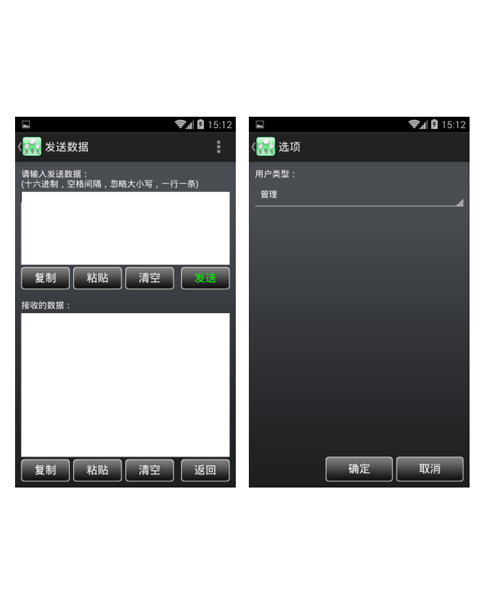
Six. Sending data on the right map:
1. Used to send data and view the received data
2. Support multiple lines, one line, one line
3, sixteen format, with space interval, neglecting size, for example: 0102 AA BB
4, beginning with a minus sign (-) said at the beginning, insert the default delay (300 ms)
5, to the plus (+) at the beginning, followed by a decimal number (MS), represents a custom delay, such as: +2000, said the delay of 2 seconds
6, unless specified, the default delay is inserted between instructions (300 milliseconds)
7. The lines that begin with other non - sixteen - base lines represent annotated lines and automatically exclude, such as: /11 2233; *11 2233
8. Can use the [load template] from the menu to load an edited instruction file
9. [received data] need to have permission to see
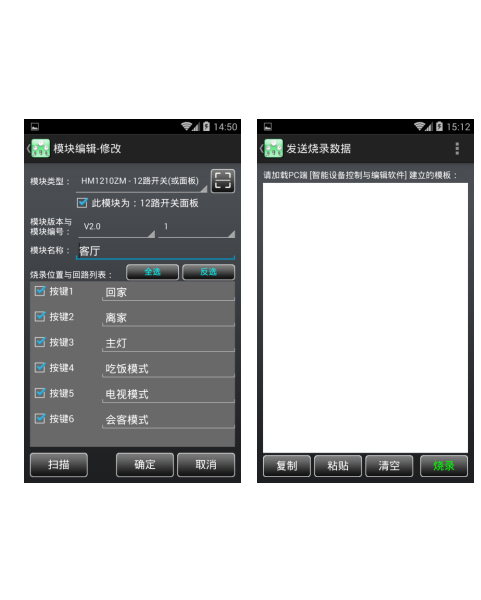
Seven. Send the recorded data, for example, on the right.
1. A template for burning the PC end [intelligent device control and editing software]
2. Can use the [load template] from the menu to load an edited template file
Warning: in order to ensure the success of the burning record, please check the following instructions carefully:
1. Ensure that the communication is normal
The 2, V1.0 version of the module is forbidden to connect to other modules during the burning
3. There will be hints after the success of the burning
4, with a minus sign (-) behavior at the beginning of the notes.
5, automatically excluded from the beginning and end of line space
6, support the custom delay, only 1 bytes, representing N 100 milliseconds, maximum FF, about 25.5 seconds)
Eight. The module editor is on the right picture.
1, for editing module and loop template
2, module type: [] due to panel and [12 road switch module] using the same procedure, so they are of the same type:
3, this module: 12 way switch panel: mainly used to distinguish the panel with [12 []] switch module, check - panel, check key list [] panel only 6
4, module version: only used for [12 road switch (or panel)]V1.0 old program. When burning, it can not connect other modules. After burning, it can not read burning content V2.0 - new program. When burning, it can connect other modules, and also burn content after burning.
Note: it is necessary to return to the factory to upgrade the program after upgrading the content without losing the distinction between V1.0 or V2.0, mainly to see if he can read the content of the burning.
5, module number: 1~255.
6, the module name: it is recommended to fill, for the recognition of
7, burn position and loop list: settings need to burn or operation of the loop with the name
8, two-dimensional code scanning: by scanning the two-dimensional code to select [type] and [module module number:]
9, through scanning: Broadcast query to select [type] and [module module number:]
Nine. The module scan is on the right chart.
1. A module for broadcasting all online queries
2, to limit the module type to scan through the filter dropdown, < > - not all restrictions
3. Start the broadcast query by [scan]
4. The advanced parameters can be set according to the [advanced] button or the list of the modules.
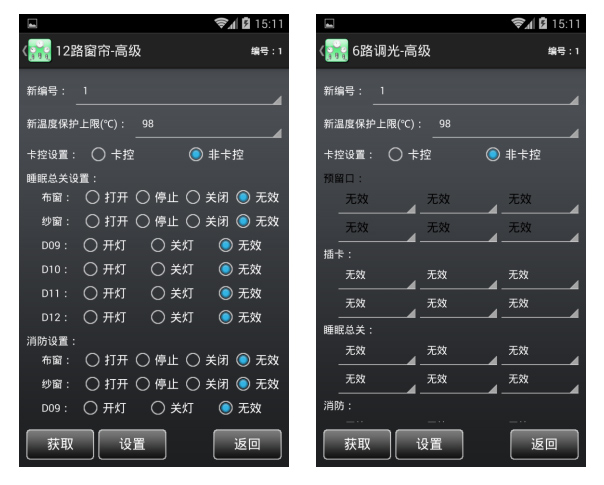
1, 12 switch (or panel) - advanced as on the right:
1. Used to set the parameters of the 12 road switch module or panel
2, you can use the [get] button to query the parameters of the current module
3, when the parameters are set, download to the new number of the module according to the [set]: the modified new number, if you do not want to modify the number, it should be the same as the old number.
New temperature protection upper limit: when the internal temperature of the module reaches the set value, the module will be locked, and the key or communication will no longer respond. After the module is locked, the temperature is lowered and the electricity is recharged to continue to work.
Card control settings: card control - need to insert card (or card code) to press the above key, but does not affect the command control; non - Card - free card
Sleep general setting: when receiving the total sleep code or triggering the mouth of the sleep, specify the lights to be opened, such as the night lamp.
Fire protection setting: when triggering the fire gate, specify the lights to be opened, such as the emergency light.

②、6 way dimming - advanced as on the right:
1. For setting the parameters of the 6 path dimming module
2. For most of the parameters, please refer to the instructions of the [12 road switch (or panel)]
Reservation: reservation function, not set
③、12 road curtains - high on the right:
1. For setting the parameters of the 12 road curtain module
2. For most of the parameters, please refer to the instructions of the [12 road switch (or panel)]
Delay setting (second): the DC motor should be set for 1 second. The AC motor needs to set the actual travel time (at least 1 minutes).
On / off and off / stop: when curtain panels are used, if there are three buttons on the curtain panels, they are generally set to [disable]; if the curtain panels have only two buttons, they are generally set to [enable].
④、Infrared transponder - advanced as right figure:
1. It is used to set the parameters of the infrared transponder
2. There is no other parameter, only to modify the number
Ten. The scene editor is like the following figure:
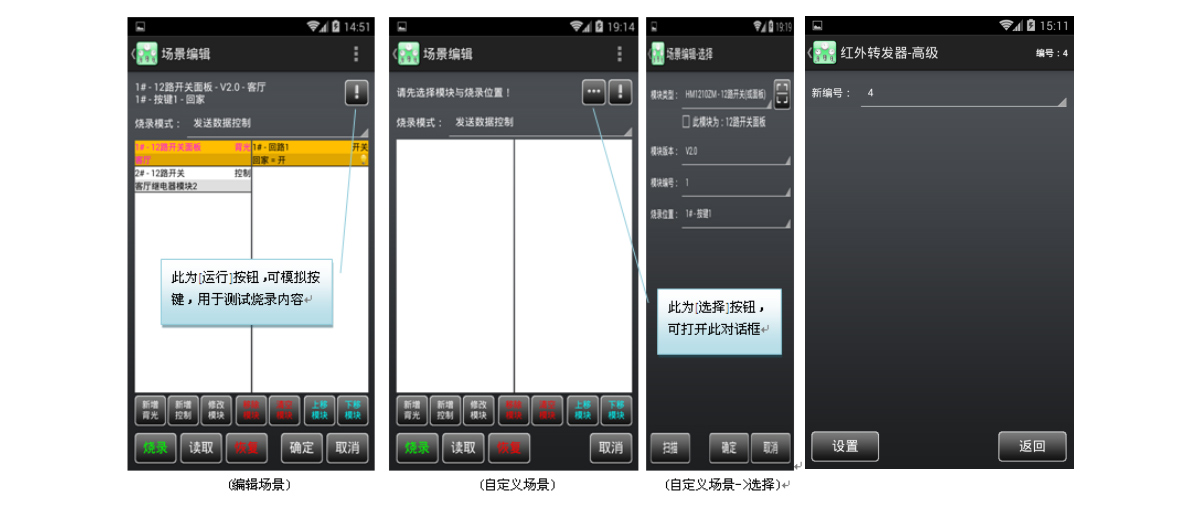
1. Used to edit the scene template
2, menu - > sort out data [read]:Used for [read] buttons, to sort read content by module type, module number
3. Operation:The key of the analog trigger module can be used to test the correctness of the burning content
4. Choice:Only for [custom scene], can choose the module and location of the burning
5. The burning mode:
Scene lamp control - It is mainly used to control the modules of the same type as the burning module. The advantage is that the code is less and the disadvantage is that the modules of different types can not be controlled.
Send data control - Any type of module can be controlled, and this mode is generally used by default
6. List:The left is a list of modules (pink is a backlight), and the right is a loop list.
7, new backlighting:Add itself or the same type of module and loop data
8. New control:Add any type of module and loop data
9. Modify the module:Modifying the data of the selected module
10. Remove the module:Remove the selected module
11. Emptying module:Empty all modules list
12. the upper shift module and the downshift module:Adjust the up and down order of the module list
13.Burning record:Burn the data
14. Read:It can only read the [12 road switch (or panel)] and the version is the burning data of the [V2.0]. The current list is emptied before reading!
15. Recovery:Delete the burning content and restore to the factory
16. Determine:There is no [determine] button for custom scene]
Eleven. New scenarios such as the following:
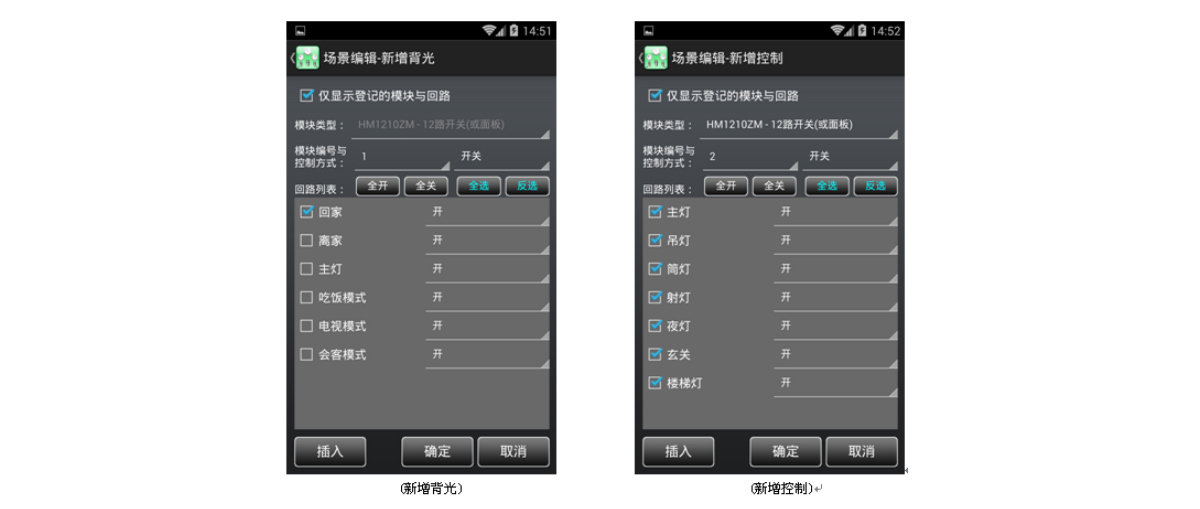
1. Used to edit module and loop data in the scene
2, only display the registered modules and circuits: after checking, only list the lists registered in the module and loop information template
3, [new backlight] or [modified module], module type is not allowed to be set (Forbidden).
[12 road switch button], [6 road dimming button], [12 road curtain key], [infrared transponder], [M9 host], these types of module loop will not empty the list of loops when added, it can be added many times, and list with serial numbers.
Other types of module loops will use overlay (empty the old list) when they are added.
4. The mode of control:
Open - Open (Bei Guangliang), send open code; turn off (back light), do not send any code. Often used in backlight interlocking, such as: home and home
When the switch is open, no code is sent; the closing code is sent. This method is basically not used
Switch - open, send open code; turn off, send off the code. It is often used to turn on the lights and turn off the lights.
5, loop list: (green represents only one drop-down value)
The following table lists the corresponding relationship between the control mode and the loop value.

Enterprise image
Hong Bogor Networking Technology Co., Ltd. (Shenzhen, Dongguan)A Hong Kong cooperation enterprises, the main products from the Internet of things, smart buildings, smart city, hotel intelligent control, public lighting control, lighting control, intelligent control of the Home Furnishing GA and production and sales of high-tech companies, has a team of more than 50 hardware and software product development team, independent research, design and development. And have independent intellectual property rights, trademarks and patents and certification.
Enterprise vision:Become a first-class intelligent brand enterprise, leading the development trend of intelligent technology.
Enterprise mission:The creation of international first-class intelligent products helps China to become an intelligent power.
Enterprise values:Altruism, benevolence, innovation, and win-win.
Enterprise team:The sun warm, honest, faithful and conscientious, of one heart and one mind.
Enterprise concept:Quality for life, innovation as the driving force, continuous improvement of self, wholeheartedly for the customers.
Enterprise service slogan:The best quality products are developed with the most rigorous work attitude, and the trust of the users is rewarded with the best quality product performance.
 STABLE, SAFE, RELIABLE, AND WE HAVE INTELLIGENCE IN THE DISTRIBUTION BOXIt brings you good quality intelligent housekeeping service, sharing a smart and convenient new life
 STABLE, SAFE, RELIABLE, AND WE HAVE INTELLIGENCE IN THE DISTRIBUTION BOXIt brings you good quality intelligent housekeeping service, sharing a smart and convenient new life
  STABLE, SAFE, RELIABLE, AND WE HAVE INTELLIGENCE IN THE DISTRIBUTION BOXIt brings you good quality intelligent housekeeping service, sharing a smart and convenient new life
  STABLE, SAFE, RELIABLE, AND WE HAVE INTELLIGENCE IN THE DISTRIBUTION BOXIt brings you good quality intelligent housekeeping service, sharing a smart and convenient new life
  STABLE, SAFE, RELIABLE, AND WE HAVE INTELLIGENCE IN THE DISTRIBUTION BOXIt brings you good quality intelligent housekeeping service, sharing a smart and convenient new life


