1. Operating environment
1, Android 4.4.2 and the above version.
2, support three ways to connect the device through WiFi, Bluetooth (to support BLE), and serial port (RS485).
3. Unless special instructions are given, the mobile phone is used instead of all the devices that support the Android system.
Two. System landing
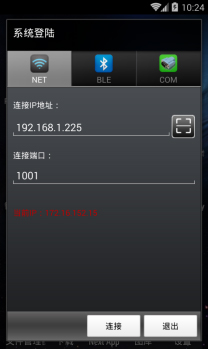
NET on the right,
1. A flat plate for WiFi or support for the RJ45 interface
2, the working mode of the networking module must be modified before connection: Server
3. If you want to use traffic for a remote connection, the network module end must have a fixed IP, or a proxy (such as the peanut shell).
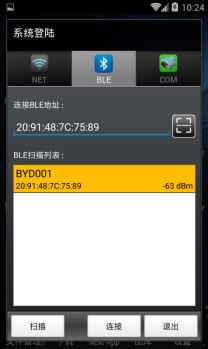
BLE on the right,
1, mobile phone must support low power Bluetooth
2, a dedicated Bluetooth RS485 module must be connected to the bus
3, when the cell phone does not support BLE, the [scan] and [connection] buttons are disabled
4. According to the [scan] button, all Bluetooth devices can be found, but only the Bluetooth RS485 module named BYD001 can be connected.
5. Press the [scan] button and stop scanning automatically after 30 seconds
COM:
1. Mobile phone (generally industrial flat) must support serial port
2, if the cell phone only supports RS232, you need to add a RS485 conversion module
Scavenging Description:
1. There is no need to select the specific connection mode when the code is scavenged, and it will be selected automatically according to the content of the two-dimensional code.
2. Support two kinds of two-dimensional codes:
A, containing only connection information, automatic filling after the scavenging is completed
B, including: connection type, connection information, module type, module number, automatic filling, automatic landing, automatic connection after the scavenging is completed
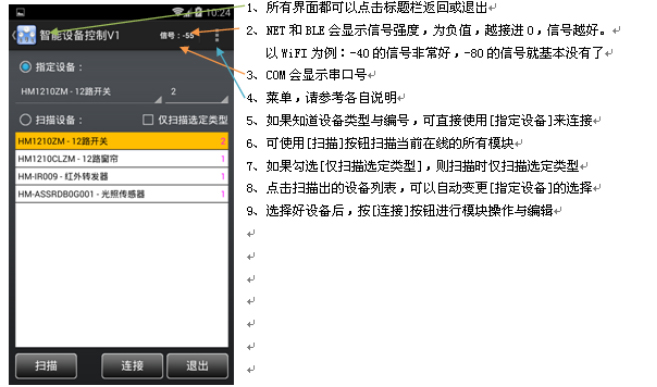
Three. The main interface is on the right.
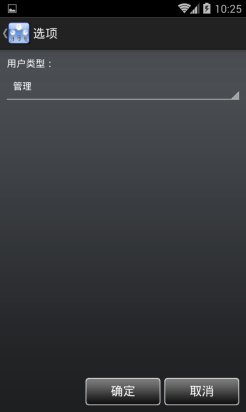
Four. The options are as follows:
User type:
One key: without a password, it is only possible to execute the [send data] in the main menu, which is generally used to assemble instructions to the customer.
Customer: need password, only can operate module, not advanced setting
Internal: you need a password, have all the functions, and only do not see the received data in [sending data].
Management: need a password, have all the functions
Five. Send data if there is a graph:
1. You can send and view the received data
2. Support multiple lines, one line, one line
3, sixteen format, with space interval, neglecting size, for example: 0102 AA BB
4, beginning with a minus sign (-) said at the beginning, insert the default delay (300 ms)
5, to the plus (+) at the beginning, followed by a decimal number (MS), represents a custom delay,
Such as: +2000, indicating a delay of 2 seconds
6, unless specified, the default delay is inserted between instructions (300 milliseconds)
7. The lines that begin with other non - sixteen - base lines are all expressed as annotated lines and automatically excluded.
For example: /11 2233; *11 2233
8. Can use the [load template] from the menu to load an edited instruction file
9. It can be used to assemble instructions in real time using the "assembly sending instruction" in the menu
10. [received data] need to have permission to see
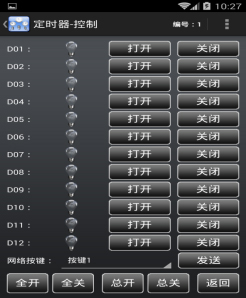
Six, 12 switch if there is a diagram:
1. Used for relay module
2. Switch the module number of the current control through the upper right corner
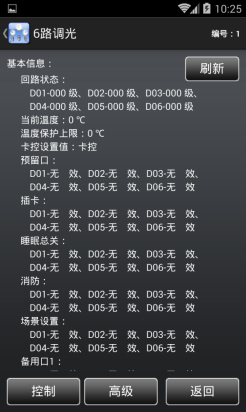
3, [basic information] shows the status and parameters of the current module
4, [refresh] to update basic information
5, [control], for operation and test modules
6, [advanced], used to modify numbers and parameters
7. There are many functions in the interface that are similar to this interface, so it will no longer be described.
Module reset method: press and hold K1, K2, K3, and then add power, reset after reset 1, parameter recovery default
Methods: to reset K1, K2, K3 welding (PCB in short contact), and then power.
1, can be directly icon on / off, can also use the open / close button
2, fully open and fully closed [] [], only for the current module
3, [total open] and [general], broadcast code, for all online modules
4. Some extension instructions are included in the menu
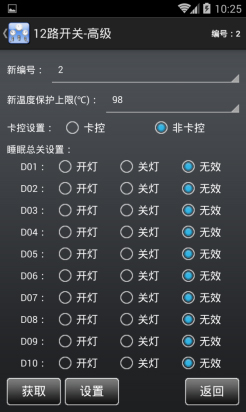
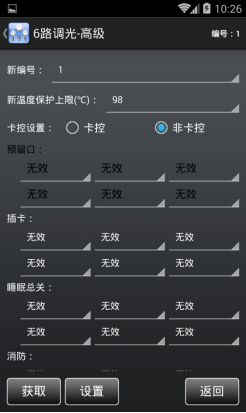
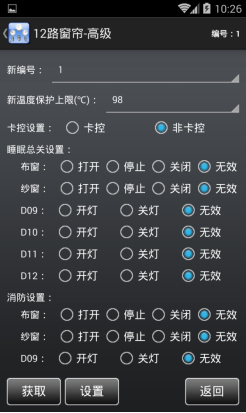
1. It is mainly used to modify the module number if there is a diagram.
2, you can use the [get] button to query the parameters of the current module
3. When the parameters are set, download to the module by [settings]
New number: the modified new number, if you do not want to modify the number, it should be the same as the old number
New temperature protection upper limit: when the internal temperature of the module reaches the set value, the module will be locked, at this time the key or the communication
No more response. After the module is locked, the temperature is lowered and the electricity is recharged to continue to work.
Card control settings: card control - need to insert card (or card code) to press the above key, but does not affect the command control; non - Card - free card
Sleep general setting: when receiving the total sleep code or triggering the mouth of the sleep, specify the lights to be opened, such as the night lamp.
Fire protection setting: when triggering the fire gate, specify the lights to be opened, such as the emergency light.
Seven, 6 road dimming if there is a picture:
1. Used for the dimming module
Reset: press and hold K7, K8, K9, and then add power
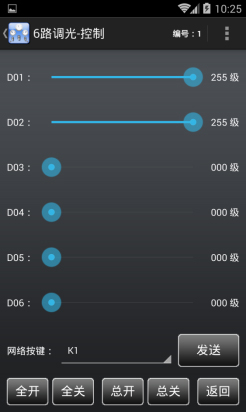
1, dragging sliders can control the brightness level of the dimming, such as the right figure:
2, click the front loop label (such as: D01), turn off the dimming to 0
3, click on the back of the dimming value label (such as: 255), dimming to the maximum level of 255
Note: it is necessary to connect the 220V power first to normal communication
1, most of the parameters, please refer to the [12 road switch] set as the right one:
Reservation: reservation function, not set
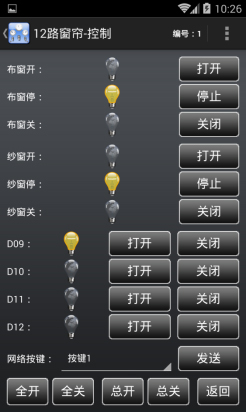
Eight and 12 curtains on the right:
1. Used for the curtain module
Reset: press and hold K1, K2, K3, and then add power
1. Please refer to the [12 road switch as the right chart.
1, most of the parameters, please refer to the [12 road switch] set as the right one:
Delay setting (second): the DC motor should be set for 1 second. The AC motor needs to set the actual travel time (at least 1 minutes).
On / off and off / stop: when curtain panels are used, if there are three buttons on the curtain panels, they are generally set to [disable]; if the curtain panels have only two buttons, they are generally set to [enable].
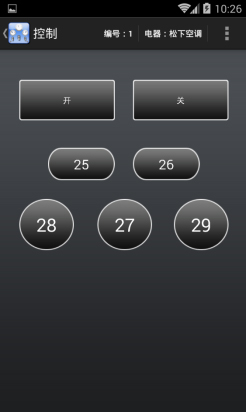
Nine. The infrared transponder such as the right picture:
1. For the infrared transponder module
2. Up to 250 infrared codes can be stored at most
3, the length of the infrared code is 128 bytes a button: 1, a short press, into the learning mode, the red light is long, the blue light is not bright:
Press the key button of the remote control: Learn success: the red light goes out, the blue light goes out one second, then the red light goes on, waiting for the next remote control button.
Learning failure: the red light flashes one second, the long light, reminding the need to relearn
Without pressing the key of the remote control, the learning mode is withdrawn from the learning mode after 10 seconds.
4, the long press 10 seconds, start the reset, blue light flash (at least 1 second), all clear after the completion of the blue light closed
1, through the infrared template to simulate a variety of remote controls such as the right picture:
2. Before use, the infrared template is loaded through the [load template] in the menu.
3. If multiple appliances are included in the template, it can be switched by the title bar appliance menu
4. The infrared template can be made and modified by the "Edit template" in the menu.

Add electrical appliances, modify electrical appliances, remove electrical appliances, such as the right picture: used to classify the infrared code, so as to distinguish a variety of remote controls.
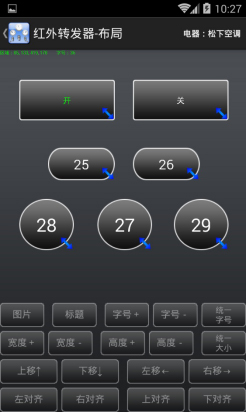
Layout: set the shape, title, position, size, etc. of each infrared code send button, similar to the buttons on the remote control.
Emptying: emptying the current list
Remove: remove the selected items up / down: adjust the up and down sequence of the selected items
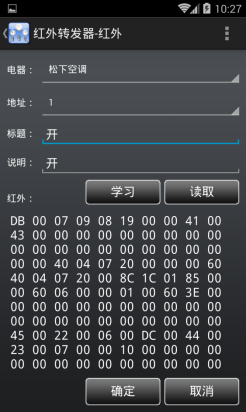
New: add an IR code
Modification: a project to be modified in the list
Read: read the infrared code from the infrared transponder according to the selected destination address
Download: redownload to the infrared transponder according to the selected destination address and infrared code
Delete: delete from the infrared transponder according to the selected destination address
Send: control infrared transponder to send infrared code to electric appliance according to the desired destination address (need to be studied or downloaded in advance)
Direct transmission: according to the infrared code of the selected item, the infrared transponder is controlled to send the infrared code directly to the electric device (without pre learning or downloading).
All read: clear the infrared code in all the electrical appliances, and read all the infrared codes in the infrared transponder and read out.
< > all the pieces in the infrared classification. Therefore, if the template has not been saved, remember to save
All downloads: download the entire template (all appliances) to the infrared transponder
Total deletion: all infrared codes in the empty infrared transponder (not affecting the template)
Warning: you must remember to save the template before the window is closed
1. Click the button area and pop up the edit tool bar as the right one:
2. Click the blank area (or press the return key) to close the Edit Toolbar
3, press the button center area to drag, can adjust the button position
4. Zoom the icon in the lower right corner of the button to adjust the size of the button.
5. You can change the shape of the button by using the [picture] in the edit tool bar
6. The current button is selected and the title is expressed in green
7, the top left corner of the screen displays some information about the selected button
8, click the menu: Electrical: XXXX, you can give up this revision
1, the menu contains some real-time operations for infrared transponders such as the right diagram:
2. Enter the learning mode by the [learning] button
3. Read the infrared code from the infrared transponder by the [read] button and the selected address.
Learning methods: press the [learning] button, the red light of the infrared transponder lights up, and the remote control is aligned with the infrared transponder.
Press the key to learn, after learning success, the infrared transponder turns green, and it closes after 1 second; if more than.
The infrared data of the remote control is not received in 10 seconds, and the learning state is automatically withdrawn.
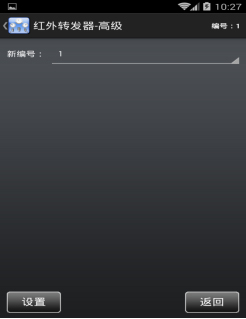
1. It is mainly used to modify the module number, such as the right picture.
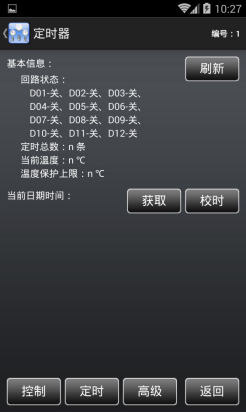
Ten. The timer is on the right.
1. Used for the timer module
2, at most can store 768 timing
3. After the time of time, there are two kinds of execution formats: one, self loop; two, custom data
4. The storage space of the custom data is 100 bytes
5. There is a time-delay resolution in the custom data, for 12 CD EF 89, for example, X1 X1 X1 12 CD EF 89 X2 X2 X2 X2,
It will be sent two times, first X1 X1 X1, delay 150 milliseconds, and then X2 X2 X2 X2
6, support the number of retransmission settings, if it is 0, do not repeat, that is, to the specified time, only once; if for 2, then to the specified time.
Then send it once, then one second at each interval, once again, only to stop over the specified number of times, 3 times a total.
7. Most of the 12 circuits are supported. The loop can be controlled by timing, instruction, and key.
8. When controlling the relay of its own circuit, zero crossing detection (220V) is required.
9. It has a locking function (used for the customer's unpaid expenses). After the lock, the keys, timing, control instructions and so on are no longer responsive, only to receive.
Unlock Order
10. It has the function of temperature protection. When the value of the thermistor is detected, the module will be locked, and all the circuits will be closed at this time.
Keys, timing, and instructions are no longer responsive. After the module is locked, the temperature is lowered and the electricity is recharged to continue to work.
11. When the first power is added, we must go to school.
Key Description:
1. When the K1~K12 single button is pressed, the opening / closing corresponding loop: relay + indicator lamp
2, long press K0 key 10 seconds, enter the reset mode (clear time, module number set 1, whether the lock is fixed, date time is constant), the indicator is urgent.
Flash (at least 1 second), when the reset is completed, the indicator is turned off.
Special address Description:
1. The address 1~10 is a special address and is often used every day or Monday to Friday.
2, the day of the year is 0 (0000/00/00). If both the week and the time conditions have been met, check whether the day is available from the address 11.
A task (judging only a date and a week, no judgment of time), no execution, no execution
3. On the day of the year, there is a non - special treatment when it is not 0, which is the same as address 11.
1. Please refer to the [12 road switch for operation.
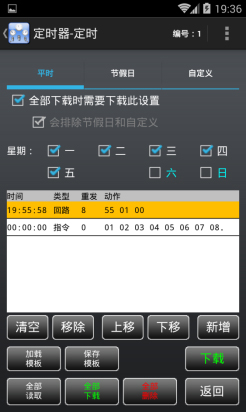
1. Edit [peacetime] template as on the right:
2, the time defined in the ordinary time, save in the special address
Clear, remove, move, move, add, modify: please refer to the [infrared transponder]
Load templates: only reload the templates from the templates (no holidays] and [custom]).
Save the template: only save [peacetime] to the template
Download: only download [normal] templates to timers
All read: it will empty [custom] list (without affecting the holidays and custom list), then store the data read from the timer in the [custom] list.
Download all: Download [usual], [holiday], [custom] select a list of [all downloads that need to be downloaded]
Total deletion: all timing in the emptying timer (not affecting the template)
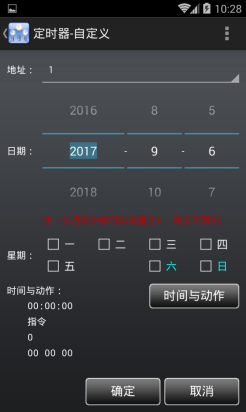
1. Edit [time and action] as on the right:
2. This is a common interface, which is used in [usual], [holiday], [custom]
3, [time] can be input with a soft keyboard
4. The finished timer is usually only integrated with one relay, so only [D01] is set in the [control loop], and the other loops are set [invalid].
5. [send instructions] can be assembled by a [custom] button
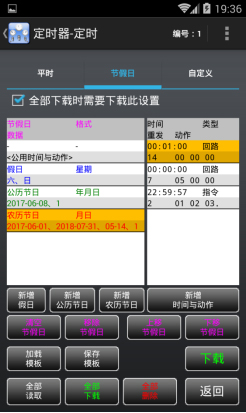
1. Edit [holiday] templates as on the right:
2, the timing defined in the holiday, save from the address 11
3, if time and action are the same, please add them in "public time and action >". After adding, they will automatically apply to every [holiday], [Gregorian Festival], and [lunar calendar].
4, [clear], [remove], [remove], [move up], [move down] Please note that the list of current operations is on the left or the right, which can be judged by color and title.
5, [loading templates], [save templates], [downloads] only operate [holiday]
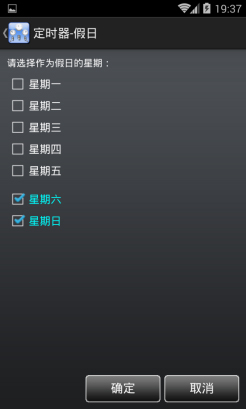
1. The list of editors [holiday] is on the right:
2. General election [Saturday], [Sunday]
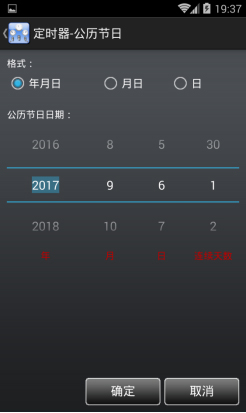
1. The list of editors [Gregorian holidays] is as right as:
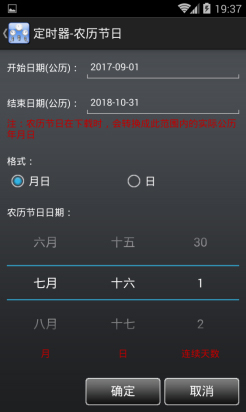
1. The list of editors [lunar holidays] is as right as:
2, because there is no calendar in the timer, the lunar calendar will be automatically converted into a Gregorian calendar when it is downloaded
3. Because the number of bars in the timer is limited, the calendar can not be transformed indefinitely, so only the lunar calendar is converted to the [start date] to the end date.
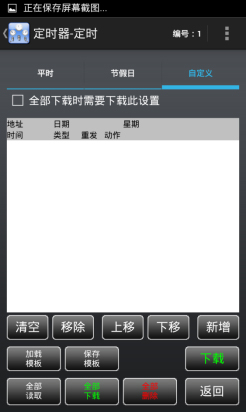
1. Edit the [custom] template as the right one:
2. The save address in the custom can be set up for yourself, but when [all downloaded], if you choose to download this set when all downloads are downloaded, it is recommended to use it first.
The [rearrangement address] in the menu comes from the recalculation of 3, [loading template], [save template], [Download], [Download] only to operate [custom]
1. Edit the [custom] list as the right one:
2. You can use [time and action] buttons to edit time, retransmission, instruction, and so on.
1. It is mainly used to modify the module number, such as the right picture.
2, [lock date] refer to the above description
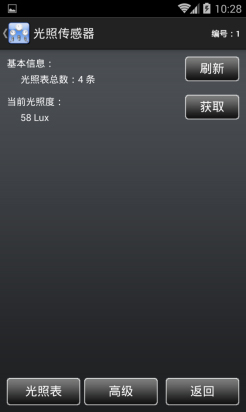
Eleven. Light sensors such as the right picture:
1. For light sensor module
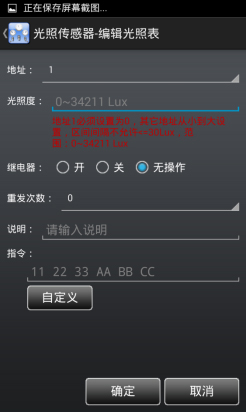
2. Up to 250 lights can be stored at most
3. The instruction storage space is 200 bytes one
4, the instructions have time delay resolution, temporary is: 12 CD EF 89, such as: X1 X1 X1 12 CD EF 89 X2 X2 X2 X2, to be divided into two sending, first hair
X1 X1 X1, after a delay of 150 milliseconds, then X2 X2 X2 X2
5, support the number of retransmission times, if 0, it does not reissue, that is, to the designated interval, only once, if it is 2, then send it to the designated interval once, then each time.
10 seconds interval, once again, only to more than the specified number of times, a total of 3 times.
6. Read a light every 10 seconds. If the light interval is the same, no instructions are sent. If the light is different, send an instruction.
7, the current interval is not changed when the deviation is + 30Lux, and the current light is prevented from shaking near the critical value.
8. Support a relay that can be set in the interval: open, close, and no operation
9. The measurement range is: 0~ 34211 Lux
10. When the power is activated, there will be a delay of 6~20 seconds (no communication at this time), which is used to stabilize the photosensitive sensor.
11, support the reset switch, the length of 10 seconds after the empty light, numbered 1, red light flash after one second close
11. The edit [light chart] template, as in the right picture:
2. Please refer to the operation method [infrared transponder]
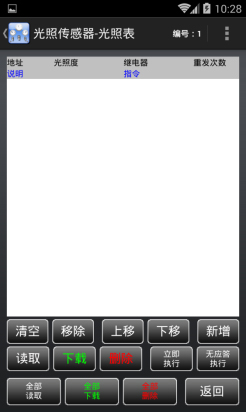
1. The edit [light chart] list is as right as:
2, the address must be set from small to large
3, address 1 must be set to 0 Lux
4. The interval interval of illuminance does not allow <=30 Lux
5, illuminance range: 0~34211 Lux
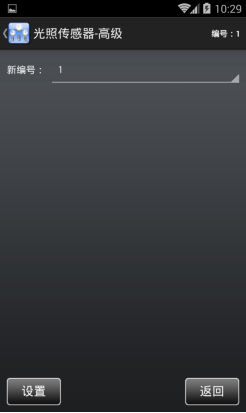
1. It is mainly used to modify the module number, such as the right picture.
Nine. Enterprise culture
Hung Bogor Network Technology Co. Ltd. (Shenzhen, Dongguan) is a Hong Kong cooperation enterprises, the main products from the Internet of things, smart buildings, smart city, hotel intelligent control, public lighting control, lighting control, intelligent control of the Home Furnishing GA and production and sales of high-tech companies, has a team of more than 50 hardware and software the product development team, independent research, design, development, and have independent intellectual property rights, trademarks and patents and certification.
Enterprise vision: to become a first-class intelligent brand enterprise, leading the development trend of intelligent technology.
Enterprise mission: creating international first-class intelligent products and helping China become an intelligent power. Enterprise values: altruism, benevolence, innovation and win-win.
Enterprise team: the sun warm, honest, faithful and conscientious, of one heart and one mind.
Enterprise concept: quality for life, innovation as the driving force, constantly improve self, wholeheartedly for the customers.
Enterprise service slogan: to develop the best quality products with the most rigorous work attitude, and return the trust of the users with the best quality product performance.

 STABLE, SAFE, RELIABLE, AND WE HAVE INTELLIGENCE IN THE DISTRIBUTION BOXIt brings you good quality intelligent housekeeping service, sharing a smart and convenient new life
 STABLE, SAFE, RELIABLE, AND WE HAVE INTELLIGENCE IN THE DISTRIBUTION BOXIt brings you good quality intelligent housekeeping service, sharing a smart and convenient new life
  STABLE, SAFE, RELIABLE, AND WE HAVE INTELLIGENCE IN THE DISTRIBUTION BOXIt brings you good quality intelligent housekeeping service, sharing a smart and convenient new life
  STABLE, SAFE, RELIABLE, AND WE HAVE INTELLIGENCE IN THE DISTRIBUTION BOXIt brings you good quality intelligent housekeeping service, sharing a smart and convenient new life
  STABLE, SAFE, RELIABLE, AND WE HAVE INTELLIGENCE IN THE DISTRIBUTION BOXIt brings you good quality intelligent housekeeping service, sharing a smart and convenient new life